
Tissue Paper Art – DIY Craft for Kids
This shop has been compensated by Collective Bias, Inc. and its advertiser. All opinions are mine alone. #CelebrateAmazingBDays #CollectiveBias
Our family celebrates about a dozen summer birthdays, three of which are for my children. My two boys celebrated their birthdays this summer, with one joining the double digits! However, this summer was a little extra special for my daughter’s 19th birthday. She just graduated high school and is leaving for the military soon so we’ve really been showering her with love lately. With all the birthday gift wrapping, we have quite a bit of tissue paper piling up. We enjoyed creating this fun tissue paper art craft as a way to paint with tissue paper.

Tissue Paper Art Supplies

- Canvas
- Mod Podge
- Sponge Brush
- Tissue Paper (upcycled tissue paper works perfectly)
- Pencil – optional
- Scissors – optional
- Paint Pen or Marker – optional
Creating a decoupage canvas with colored tissue paper is a fun art craft for the kids to make. You can get as creative as you want. Don’t toss the tissue paper out of your gift bags just because it is wrinkled. The creases give your art project a crinkle effect that looks really neat!

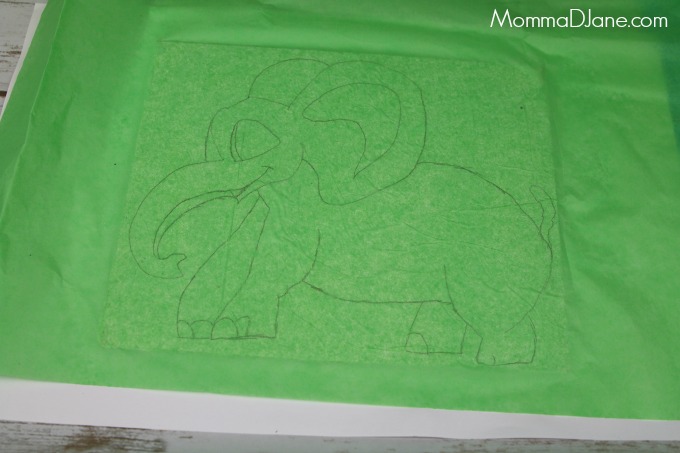
First decide if you want your art canvas to be a specific design or image. You can use a pencil to draw something on the canvas or simply have fun making a random design as you go. Do not worry if you mess up on your canvas, the tissue paper will cover your pencil marks. As you can see on the elephant’s trunk, I decided to make it larger than my original drawing. Same with the face.
My oldest daughter loves elephants and even collects them. She only wishes she could have a real one. So for her birthday the younger kids and I decided to create her an elephant tissue paper art canvas.

After you decide on your design, select which colors of tissue paper you want to use. You can mix it up, use only a couple of colors or make it rainbow. Get creative and enjoy!
Paint your entire canvas with Mod Podge. After the first layer is down, quickly add your tissue paper before it dries. I wanted the entire canvas to have one background color first, so I covered the whole canvas and the tore the edges off.


Since my tissue paper art was a specific image, I decided to trace the elephant in blue tissue paper to cover. However, this is where you can get crafty and use smaller pieces to decoupage instead. To layer the blue tissue paper on top of the green, I added more Mod Podge first, then laid down the tissue paper and painted another layer of Mod Podge.

It dries rather quickly so you can continue to add layers of tissue paper as you go. After the blue tissue paper layer, I added a sheet of purple tissue paper covering the entire canvas. Then I cut out pieces for the ear and eye in a lighter shade of blue to add to the top. The crunched up tissue paper made a perfect little cloud and grass at the bottom.
As the tissue paper art dries, the various colors start to shine through. I went over the outline of the elephant with a silver paint pen to make it stand out. This is completely optional and not necessary.
Tissue Paper Art – DIY Craft for Kids

While shopping at Walmart for my daughter’s planner supplies for her birthday, I picked up this adorable gift bag and some birthday cards.

Gone are the days of those plain rectangle flat cards. Check out this beautifully bright three dimensional greeting card from the American Greetings Lily Pad Press collection. I just love them!
For several years it was a tradition to make cake-pops for each child’s birthday. We have changed some of our traditions now, but I couldn’t help but give her this card for old time’s sake.


Our family kept with the colorful theme by each signing with different color gel pens. My teen keeps her cards as keepsakes. She loves looking back on them. Her favorite is receiving a card in the mail from a long distant relative or friend. With so much technology nowadays it is nice to still receive a handwritten greeting card that you know the person took time to select just for you.

The American Greetings gift bag also goes with the three dimensional theme by having the Happy Birthday sign standing out from the bag. The glitter accents really make it sparkle. It makes gift wrapping simple while still looking very nice.

The American Greetings Lily Pad Press collection has become my favorite. I cannot wait to send this ‘Thinking of You‘ card to one of my girlfriend’s out of state. The tiny flowers and coffee cup are standing out away from the card. It provides an extra little touch of something special to the card.
Really interesting article.Hope your kid loved all the gifts and birthday card.The DIY project is really awesome.And,yes it is still interesting to receive a Birthday card on post.
Fun project!
My kids would love this!
Thanks
Michelle
Never tried this. Looks pretty.
We did a fun tissue transfer art project a month or so ago and my boys were disappointed in how they turned out and I promised them that we could use tissue paper with mod podge or watered down glue to make it more permanent next time. This is so cute! Pinned.
Inspire Me Monday
How neat!! Thanks for the step by step tutorial!
How wonderful that you put so much work into her last birthday at home.
I keep cards too!
Congrats on your recent marriage!
What a great card idea. I love it and it’s so easy to make. Thank you for sharing at Dishing it and Digging it link party. It’s great having you.
This is so adorable!Thanks for linking up to Merry Monday! Pinned! Have a great week!
Kim