
How to Make a Teepee – DIY Cat Bed
Our animals are family to us and we treat them as such. Since I love to get creative, my teen asked me to make her cat a teepee bed. She selected fabric to match her own room decor which is where, Hermione, her cat stays. Whether this will become a little storage nook for her toys or if she will truly sleep inside it, we aren’t sure yet. Hermione usually sleeps on top of T’s head or on the pillow next to her but maybe during the day she will come to love the new teepee. Either way, it sure is adorable.

How to Make a Teepee for Your Cat
Supplies
- Fabric – 2 Yards
- Jute or String
- Hot Glue Gun & Glue
- Thick Wooden Sticks – 4
- Thin Wooden Sticks – 1 long

You can find all of these items at your local craft store. The thick wooden sticks will stand to make the frame of your teepee. We did not cut them down in length. We left them the in the original height and it worked perfect for us. There was a little extra room at the top if you wanted to shorten it.
Once you gather your four posts together at the top to make a triangle of sorts you will hold the sticks into place and use the jute or string to secure it. The bottom of the posts will try to come together and you may need two people for this part. The bottom of the posts should form a rectangle so there is plenty of room for your cat’s bed to go inside the teepee. We measured roughly 60 inches around the bottom. This way we knew we only needed two yards of fabric in length to wrap around.
*I highly recommend you measure how large you want your teepee before buying fabric. Remember 36″ is in one yard.

When wrapping the post with the jute it is easier to secure if you wrap between each post. Wrap once around the first stick, then loop around the next and just keep wrapping. Do this about three times before wrapping the outside of the sticks to hold together. This way it secures each post to the one next to it.
*Do not wrap the jute around the individual posts too much or it will cause thickness between the sticks. Just a couple of times to secure it is plenty.
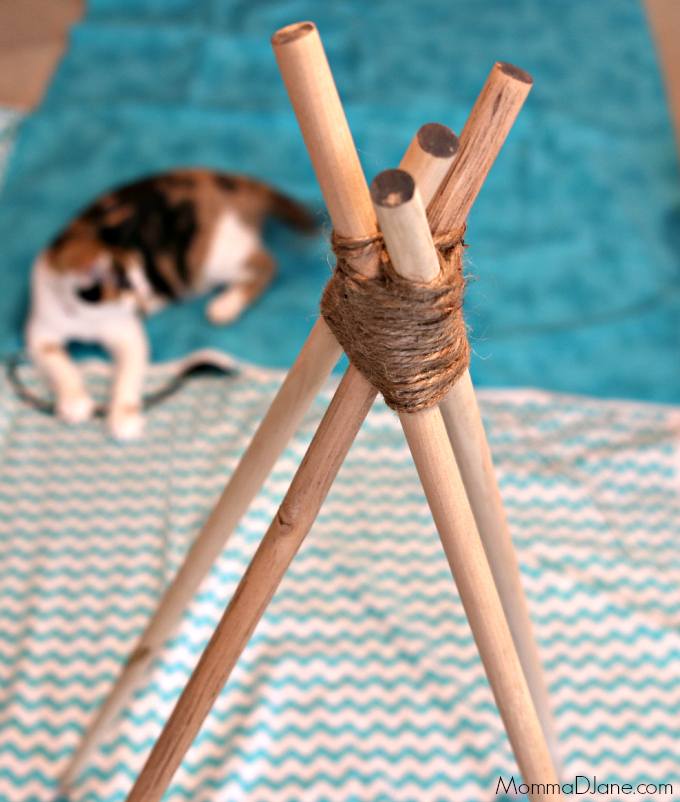
To make the top of your teepee look nice, wrap the jute around and use your hot glue gun to secure each piece in place. Wrap for several inches.
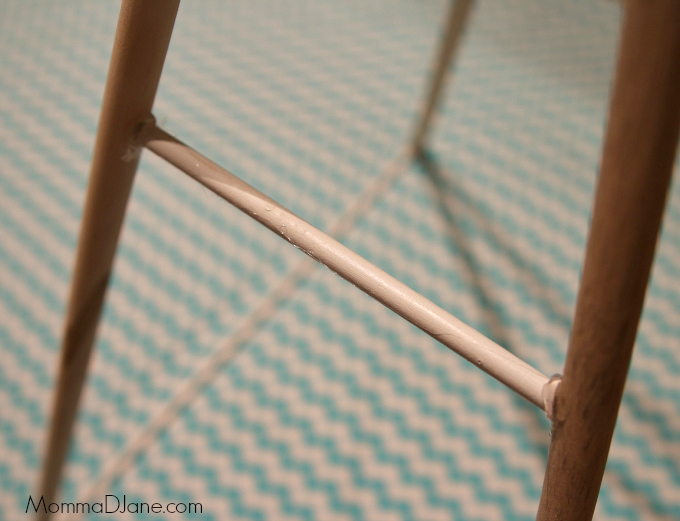
Even after adding the jute around the top of your teepee the bottom may still try to come together. This is not unusual. To secure your teepee in place use the smaller stick you purchased to place support bars between the outer posts.
We used a small handheld saw to cut the smaller stick into pieces and hot glue to secure in place. On the sides we placed the support bar towards the top and on the back we placed one across the bottom.

Now that your teepee frame is complete, it is time to add the fabric. This is the fun part and can be slightly difficult for one person to do alone.
Start in the back. Trust me on this one. If you start on one side and try to work your way around the fabric will gather and twist. It will not lay on straight and the pattern of your fabric will look sloppy. If you start in the middle of your fabric on the back of your teepee and wrap each side towards the front it will lay much smoother.
As you lay the fabric on the top back of your teepee, use your hot glue to secure the fabric into place directly under the jute.
As you pull the fabric forward you will most likely have lots of extra fabric. Cut this once you have it securely in place. You can tuck and glue as you go. I left just enough extra fabric in the front to wrap around the posts and hot glue into place. I know a traditional teepee has fabric hanging down to close for a door but since this is for a cat I didn’t want to tempt her to play with the fabric and rip it.

After wrapping the fabric around the front two posts to leave it fully open, I glued the fabric under the bottom to each post. This way it held secure and there wasn’t any room for her to attempt to crawl under the teepee and the floor.
I wrapped the fabric around the post similar to tucking in a sheet on the corner of your bed.

All sides should be nice and smooth.

I would say Hermione approves.

She enjoyed sniffing around and checking out her new digs.
Hermione looks so cute inside her Teepee!! We’re glad she liked Purina Muse®. Thanks #client
It’s awesome! Great creativity… I am going to create it for my kitten. Cat is looking amazing inside the tepee. Thanks for the amazing tips.
This is adorable. I don’t have cats, but a larger version would be amazing in my children’s reading nook.
love it your kitty looks so cute unfortunately frankie is very picky and he has to have his pillow and baby blanket or its not happening great job though zen hugs and purrs now following
Love this! I have a senior dog and she would love to be able to curl up in her own little teepee and sleep the day away!
Hi Dwan! What a cute idea. Love the fabric. I don’t have a cat but 2 dogs and I’m not sure they’d make use of this but I’m sure if I made it a little bigger my kids would love it! Thanks so much for linking up to Thriving on Thursdays. It was a real pleasure to have you join us. I’m featuring this post at tomorrow’s party.
Anne @ Domesblissity
G’aww~!! Super cute! I know my Avery would love this.
Adorbs!
This is so cute. My small dog acts like a cat and I think this would be perfect for him and his sister.