
Easy Marquee Letter Craft
When I saw these cute marquee letter kits at our local Michael’s store I knew I had to make one for Gabby. There are unlimited ways you can craft your marquee letter to match your taste in design. Since Gabby’s room is decorated in purple I knew I wanted something that would go well sitting on her nightstand. With it being battery operated the marquee sign can sit anywhere without the worries of an outlet.

I surprised Gabby with the marquee sign at her birthday party. I used it as part of the decorations for the party, plus a small gift for her to keep and add to her room. The on/off switch is easily accessible on the back. Gabby can turn it on to use as a reading light and then off before going to sleep without getting up.
When shopping at Michael’s I always use their 40% off coupon on one of my full priced items. You can find the coupon in their weekly ad or even pull it up on their website from your smartphone before checking out. When I used the coupon it made the kit under $8. The kit came with the lights, light bulb covers, cardboard marquee letter and paper template.
Supplies Needed:
- Marquee Letter Kit from Michael’s
- Scrapbook Paper
- Pencil for tracing letter
- Mod Podge
- Glitter (color of your choice)
- Paint Brush
- Large bowl or baking sheet to catch glitter
- Batteries
The marquee kit comes with an extra paper letter to use as a template. This made things very simple for me. I used the G template to trace on the scrapbook paper and then cut it out to fit perfectly inside the marquee. Since the purple scrapbook paper I selected at Michael’s had a nice silver glitter design on it, I decided to cover the outside of the G with glitter. The only downfall with this is I did get glitter all over myself and anywhere the marquee sign sits it leaves a little glitter behind.
Once the inside of the G was fitted with the scrapbook paper I moved on to decorate the outside. Doing the inside first made it easy for me to avoid putting my hands on the freshly added glitter later on.
To add the glitter I used Mod Podge and a paint brush. I did a small section at a time. I would paint the Mod Podge on and then sprinkle the glitter and so on. After I went around the entire letter I went back over a few places that were not covered as much. I used the edge of the paint brush to dab just a little Mod Podge in those areas. I highly recommend doing this over a large bowl or baking sheet. I was able to catch a lot of the glitter this way and not waste it. The middle-inside of the G was the most difficult part to apply glitter. I poured a lot of glitter out to try and cover such a small section since it kept missing it. This area took patience.
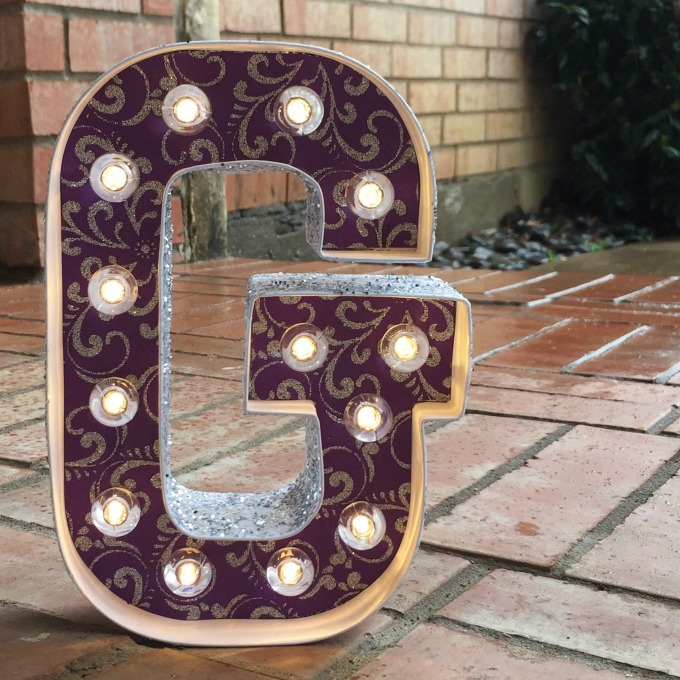
The kit comes with instructions on how to add the lights – although it is pretty self-explanatory. Depending on which letter you buy, you may place the battery box in a different area. It fits snuggly inside the back so the marquee sign can sit against a wall. The light covers (round bulbs in front) were a little tough to push into the cardboard. We kept twisting back and forth until we got them in. The lights were put in from the back and fit into the bulb covers smoothly.
The marquee letter was fun to craft. Even kids could help you decorate their own. Some other options for decorating may include washi tape, paint or even hand-drawing a design on the letter template. This kit makes an easy gift that will be enjoyed for many days. Kids could draw a pretty picture on a letter M for Mother’s Day or put three together to spell out mom. The letters are not very large at all and would fit nicely on a desk.
Have you made a marquee sign for your home? How did you decorate it?
For more easy gift ideas, visit a few of my favorite bloggers:
- DIY Lavender Facial by Confessions of an Overworked Mom
- Easy Cookie Platter Mother’s Day Gift by A Mom’s Take
- DIY Mother’s Day Herb Garden Gift by Mom Does It All
- DIY Vanity Tray by Style on Main
- Homemade Painted Glass Bottle by Our Family World
- Thanks a Latte Teacher Gift by Simply Southern Mom
- DIY Shea Butter Lotion Bars by Better in Bulk
- DIY Mother’s Day Coupon Book for Twin Moms by Mom on the Side
- DIY Butterfly Wall Hanging by Home and Garden Cafe
- Party Worthy Spinach Salad with Strawberries by Day by Day in Our World
- DIY Aromatherapy Shower Fizzies by My So Called Balanced Life
- Easy DIY Photo Coasters & a Delicious Mocktail to Spoil Mom by Two Boys One Girl One Crazy Mom
- Add Some Style to Your Sunglasses by Greta’s Day
- DIY Kitchen Herb Garden Gift by About a Mom
- Pasta Picture Frame by Upstate Ramblings
- School’s Out for Summer Gift by The Guavalicious Life
That is so fun! I could see it being cute in a tween room!
So adorable!! I personally love the G since that’s the initial of my last name. 🙂
What a fun idea! I love that it lights up. Definitely a fun way to brighten up a room!
This is super duper cute. I want one for my office! I think kiddo and I could have some fun making these.
This is so stinkin’ cute! I wish I had a girl, because I would definitely make one of these. Super impressive that you are so crafty. Gabby is lucky to have you!
This is super cute! I love that it comes with the little lights. My daughter is only 3 and even though we have 2 night lights in her room, she always says it’s too dark. This may be a perfect solution to add some light into her room at bedtime.
You did such a cool job with the glitter and the background paper! Outstanding! I need to go shopping now that you have inspired me to add a really cool addition to a teen room!
What a fun craft! My daughter would love this in her room.
That is a super cute idea! I bet it would be great for outdoor entertaining during the summer too!
I haven’t seen these before but I am going to get one the next time I go to Michael’s. I love the way it turned out.
This is gorgeous. I have always wanted to make one
Oh I love this. I need to make one of these for my daughter’s room. She would love it.
That is definitely so super cool! Thanks for sharing!